As
We have already seen Windows Workflow allows us to build custom activities in
code. There are several types of custom
activities we can build depending on the base class.
In this post we will create a simple custom activity that includes Pre/Post processing capabilities.
Base Class
|
Used For
|
Activity
|
Activities that are
composed of other activities
|
CodeActivity
|
Activities that want
to control execution
|
AsyncCodeActivity
|
Activities that want
to do async work during execution
|
NativeActivity
|
Activities that
contain other activities or need advanced services from the workflow runtime
|
In this post we will create a simple custom activity that includes Pre/Post processing capabilities.
- Start Microsoft Visual Studio 2010 from Start | All Programs | Microsoft Visual Studio 2010.
- To begin this project we can use the solution we finished from the previous article Error Handling
- Press CTRL+SHIFT+B to build the solution.
- In the Solution Explorer, right click on the HelloWorkflow solution file and select Add / New Project.
- Select
the Workflow templates and choose Activity Library. Name the project HelloWorkflow.Activities.
 Add a new Activity Library project named HelloWorkflow.Activities
 - Delete Activity1.xaml, you will not need it for this project.
- In the Solution Explorer, right click on the HelloWorkflow.Activities project and select Add / NewItem (Ctrl+Shift+A)
- From
the Workflow templates select Code Activity and name it PrePostSequence.
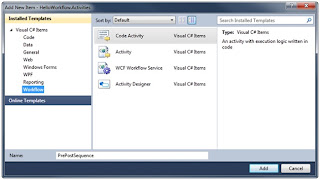 Add a new Code Activity named PrePostSequence
 - The
PrePostSequence class will serve as
a container for other activities. We need to make some changes to the code
provided by the template. Delete the content of the class and replace it with
the following code:C#public sealed class PrePostSequence : NativeActivity{public Activity Pre { get; set; }public Activity Post { get; set; }public List<Activity> Activities { get; set; }public PrePostSequence(){Activities = new List<Activity>();}protected override void Execute(NativeActivityContext context){// Schedule the activities in ordercontext.ScheduleActivity(Pre);Activities.ForEach((a) => { context.ScheduleActivity(a); });context.ScheduleActivity(Post);}}Visual BasicEnd ClassPublic NotInheritable Class PrePostSequenceInherits NativeActivityPublic Property Pre() As ActivityPublic Property Post() As ActivityPublic Property Activities() As List(Of Activity)Public Sub New()Activities = New List(Of Activity)()End SubProtected Overrides Sub Execute(ByVal context As System.Activities.NativeActivityContext)' Schedule the activities in ordercontext.ScheduleActivity(Pre)For Each Activity In Activitiescontext.ScheduleActivity(Activity)Nextcontext.ScheduleActivity(Post)End Sub
- Open
SayHello.xaml in the designer.
Notice that the toolbox now contains our PrePostSequence
activity. Drag it on to the surface just
below the Finally block. The activity
may work but it isn’t very useful yet. You need to create a custom designer.
 The PrePostSequence activity without a custom designer


Next we will create a custom activity designer for the PrePostSequence Activity.
- In the Solution Explorer, right click on the HelloWorkflow solution file and select Add / New Project.
- Select
the Workflow templates and choose
Activity Designer Library. Name the
project HelloWorkflow.Activities.Designers.
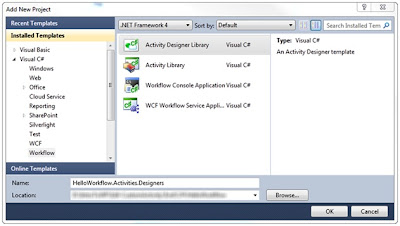 Add a new Activity Designer Library
 - Delete ActivityDesigner1.xaml, we will not need it.
- In the Solution Explorer, right click on the HelloWorkflow.Activities.Designers project and select Add / New Item.
- From
the Workflow templates select Activity Designer and name it PrePostSequenceDesigner.
 Add the PrePostSequenceDesigner activity designer
 - Replace
the template XAML with the following:XAML (C#)<sap:ActivityDesigner x:Class="HelloWorkflow.Activities.Designers.PrePostSequenceDesigner"xmlns="http://schemas.microsoft.com/winfx/2006/xaml/presentation"xmlns:x="http://schemas.microsoft.com/winfx/2006/xaml"xmlns:sap="clr-namespace:System.Activities.Presentation;assembly=System.Activities.Presentation"xmlns:sapv="clr-namespace:System.Activities.Presentation.View;assembly=System.Activities.Presentation"><StackPanel><Border BorderBrush="Green" BorderThickness="4" CornerRadius="5"><sap:WorkflowItemPresenter Item="{Binding Path=ModelItem.Pre, Mode=TwoWay}" HintText="Insert Pre Activities Here"/></Border><Border BorderBrush="Red" BorderThickness="4" CornerRadius="5"><StackPanel><Border BorderBrush="Black" BorderThickness="2" CornerRadius="5"><TextBlock HorizontalAlignment="Center">Activities</TextBlock></Border><sap:WorkflowItemsPresenter Items="{Binding Path=ModelItem.Activities}" HintText="Insert Activities Here"><sap:WorkflowItemsPresenter.SpacerTemplate><DataTemplate><Ellipse Fill="Red" Width="30" Height="30" /></DataTemplate></sap:WorkflowItemsPresenter.SpacerTemplate><sap:WorkflowItemsPresenter.ItemsPanel><ItemsPanelTemplate><StackPanel Orientation="Horizontal"/></ItemsPanelTemplate></sap:WorkflowItemsPresenter.ItemsPanel></sap:WorkflowItemsPresenter></StackPanel></Border><Border BorderBrush="Black" BorderThickness="4" CornerRadius="5"><sap:WorkflowItemPresenter Item="{Binding Path=ModelItem.Post, Mode=TwoWay}" HintText="Insert Post Activities Here"/></Border></StackPanel></sap:ActivityDesigner>XAML (VB)<sap:ActivityDesigner x:Class="PrePostSequenceDesigner"xmlns="http://schemas.microsoft.com/winfx/2006/xaml/presentation"xmlns:x="http://schemas.microsoft.com/winfx/2006/xaml"xmlns:sap="clr-namespace:System.Activities.Presentation;assembly=System.Activities.Presentation"xmlns:sapv="clr-namespace:System.Activities.Presentation.View;assembly=System.Activities.Presentation"><StackPanel><Border BorderBrush="Green" BorderThickness="4" CornerRadius="5"><sap:WorkflowItemPresenter
Item="{Binding Path=ModelItem.Pre, Mode=TwoWay}"
HintText="Insert Pre Activities Here"/></Border><Border BorderBrush="Red" BorderThickness="4" CornerRadius="5"><StackPanel><Border BorderBrush="Black"
BorderThickness="2" CornerRadius="5"><TextBlock
HorizontalAlignment="Center">Activities</TextBlock></Border><sap:WorkflowItemsPresenter
Items="{Binding Path=ModelItem.Activities}"
HintText="Insert Activities Here"><sap:WorkflowItemsPresenter.SpacerTemplate><DataTemplate><Ellipse Fill="Red" Width="30" Height="30" /></DataTemplate></sap:WorkflowItemsPresenter.SpacerTemplate><sap:WorkflowItemsPresenter.ItemsPanel><ItemsPanelTemplate><StackPanel Orientation="Horizontal"/></ItemsPanelTemplate></sap:WorkflowItemsPresenter.ItemsPanel></sap:WorkflowItemsPresenter></StackPanel></Border><Border BorderBrush="Black" BorderThickness="4" CornerRadius="5"><sap:WorkflowItemPresenter Item="{Binding Path=ModelItem.Post, Mode=TwoWay}" HintText="Insert Post Activities Here"/></Border></StackPanel></sap:ActivityDesigner>Note : WorkflowItemPresenter / WorkflowItemsPresenterOur custom designer uses databinding to bind to the properties of the PrePostSequence class. The Pre and Post properties are a single activity so the designer uses WorkflowItemPresenter to enable a design surface for them.The Activities collection uses the WorkflowItemsPresenter to create a design surface that can hold a collection of activities. - Press CTRL+SHIFT+B to build the solution.


Now
we have a designer for your class, but it will not be used until we link it
to the custom activity created in next steps:
- In the Solution Explorer, right click on the HelloWorkflow.Activities project and select Add Reference.
- From the projects tab, add a reference to HelloWorkflow.Activities.Designers.
- Select
Add Reference again, and add
references to the following assemblies from the .NET tab:◦ System.Activities.Presentation◦ PresentationFramework◦ PresentationCore◦ WindowsBase
- Open PrePostSequence.cs (C#) or PrePostSequence.vb (VB).
- Add
the following namespace directives:C#using System.ComponentModel;using HelloWorkflow.Activities.Designers;Visual BasicImports System.ComponentModelImports HelloWorkflow.Activities.Designers
- Add
the following attribute to the PrePostSequence
class.C#[Designer(typeof(PrePostSequenceDesigner))]public sealed class PrePostSequence : NativeActivityVisual Basic<Designer(GetType(PrePostSequenceDesigner))>Public NotInheritable Class PrePostSequence
- The HelloWorkflow host project will need a reference to the custom activity project. In the Solution Explorer, right click the HelloWorkflow project, and select Add Reference. From the project tab select HelloWorkflow.Activities.


No comments:
Post a Comment